Today, I took an unexpected sick day when I realized that I needed to deal with both a dentist appointment and what looks to be an infected tick bite (we don’t mess with Lyme disease up here in the northeast!). I feel fine, but I just needed to deal with these two appointments, and that was going to take a chunk out of my work day, so I just took it as a sick day. I was done dealing with both issues by about 2pm, so I decided to tackle the abstract iceberg foundation papers.
As a reminder, I planned this quilt out a couple of weeks ago. I have a foundation paper-pieced pattern that I’m going to use, and I copied all of the foundation papers for it and labeled them according to a diagram of the quilt back then, but stopped short of projecting the image onto the papers and deciding which piece would be what color. I tackled that part of the project today.
What I did:
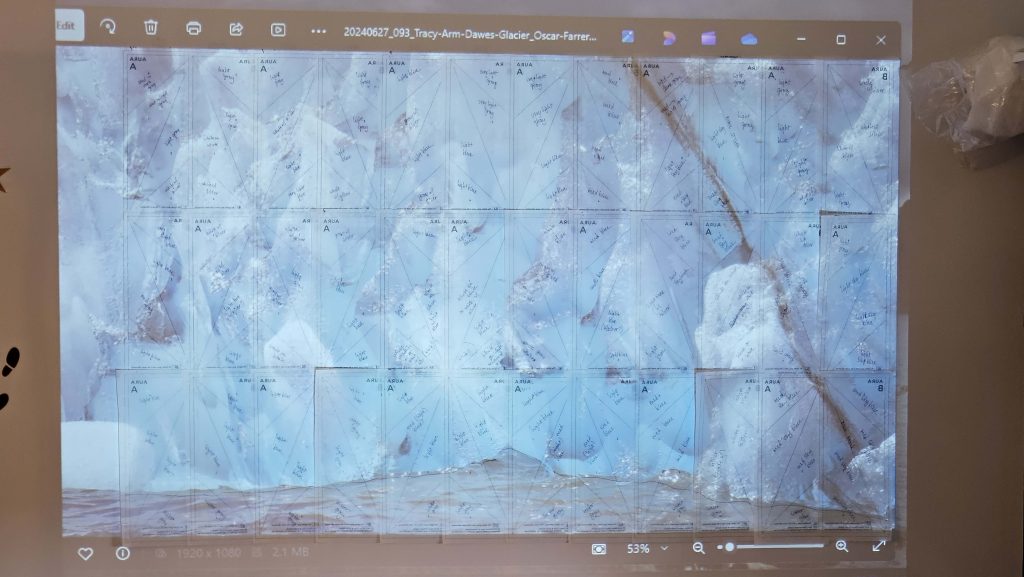
I started by taking my felt design wall down and working with the bare wall. Fortunately, I have very light gray walls, so I didn’t have to cover them with white paper or anything like that to get true colors. I taped the foundation papers to the wall in the formation that they will be in once all of the fabric is sewn to them. So in the end, the papers covered the wall exactly the size of the final quilt. Then I turned on the projector and lined the image up with the papers on the wall. It didn’t have to be exact; this pattern’s pieces are pretty big, so a few millimeters here and there weren’t going to make a huge difference in the end.

Once the image and the papers lined up, I labeled each foundation paper with the colors that the four fabric pieces would be, based on the image that was projected onto it. This proved to be far more challenging than I thought it would be. The fabrics I have for this quilt fall into four main colors – light ice blue-green, light gray (with or without silver on it), dark gray, and white on white. I found that I need more than that. I’ll use everything I have, but I also need a medium gray, a silver on white, and several blues I did not expect to need – a slightly darker ice blue-green, plus a light and medium sky blue (I did find a good medium sky blue in my stash). I was actually a little surprised to find that there was as much variation in the colors in the image as there is.
About halfway through labeling the pieces, after adding yet another color, I started to wonder whether or not I should have done this part first, before I even tried to go out and get a bunch of fabrics. It probably would have been a good choice. I have a much better idea of what the fabric requirements are for the whole quilt (me =/= a good estimator of size), so I might not have gotten nearly as much fabric as I did without really knowing what kind of quilt I was going to make. But I’m also not sure I would have come this far in thinking about the design of the quilt without some fabrics in hand. So I think it could have gone either way. Could I have done this without having any of the fabrics? Sure. But I think I now have a different mind’s-eye image of this photograph, so if I had waited to get fabrics until I had finished what I did today, I think I would be making very different fabric choices.
I imagine that this will be a technique I use moving forward with other images and published patterns. It might be a little difficult with a pattern that isn’t foundation paper-pieced; I think I might have to take a look for some larger pieces of gridded white paper so that I can map out what a pattern might look like if the pattern doesn’t already come with a coloring page to experiment with different color combinations (both of the patterns I’ve used so far for the Horseshoe Canyon and abstract iceberg quilts have had coloring pages).
A couple of things I learned today:
- I am out of Scotch tape. I’m not 100% sure when the last time was that I was out of Scotch tape, but it has to have been many, many years ago. I could have sworn I have more tape somewhere, but I couldn’t find it. I used the last piece on the last foundation paper.
- Tape the pieces to the wall, but not to each other. All of the tape has to be peeled off afterward, and it’s easier to peel one piece of tape off of one piece of paper, not multiple pieces of tape off of each piece of paper.
- Draw the contours of the image onto the foundation papers, even if you won’t use them in the final quilt. I drew the line between the bottom of the iceberg and the water onto the papers. I probably won’t use that info when piecing, but it will be helpful to have if I have questions or want to make a different choice if the water ends up looking weird.
- Take pictures before you take everything down! The pictures should include closeups of every foundation paper with the image projected onto it, plus the whole image with the papers “behind” it. I didn’t want to tape all of those papers to the wall a second time, so I made sure to document it ALL.
All in all, I’m a big fan of this process. The jury is still out on whether the result will live up to my expectations.
