WordPress database error: [The MySQL server is running with the --read-only option so it cannot execute this statement]
DELETE FROM `wp_options` WHERE `option_name` = '_site_transient_wp_theme_files_patterns-890b82f054d0977074a5148474f89490'

WordPress database error: [The MySQL server is running with the --read-only option so it cannot execute this statement]
DELETE FROM `wp_options` WHERE `option_name` = '_site_transient_timeout_wp_theme_files_patterns-890b82f054d0977074a5148474f89490'

WordPress database error: [The MySQL server is running with the --read-only option so it cannot execute this statement]
INSERT INTO `wp_options` (`option_name`, `option_value`, `autoload`) VALUES ('_site_transient_timeout_wp_theme_files_patterns-890b82f054d0977074a5148474f89490', '1740324382', 'off') ON DUPLICATE KEY UPDATE `option_name` = VALUES(`option_name`), `option_value` = VALUES(`option_value`), `autoload` = VALUES(`autoload`)

WordPress database error: [The MySQL server is running with the --read-only option so it cannot execute this statement]
INSERT INTO `wp_options` (`option_name`, `option_value`, `autoload`) VALUES ('_site_transient_wp_theme_files_patterns-890b82f054d0977074a5148474f89490', 'a:2:{s:7:\"version\";s:3:\"3.8\";s:8:\"patterns\";a:0:{}}', 'off') ON DUPLICATE KEY UPDATE `option_name` = VALUES(`option_name`), `option_value` = VALUES(`option_value`), `autoload` = VALUES(`autoload`)

WordPress database error: [The MySQL server is running with the --read-only option so it cannot execute this statement]
UPDATE `wp_options` SET `option_value` = '1740322582.7028400897979736328125' WHERE `option_name` = '_transient_doing_cron'

Making the Quilts – Page 2 – Allison Rainville

Halfway Done

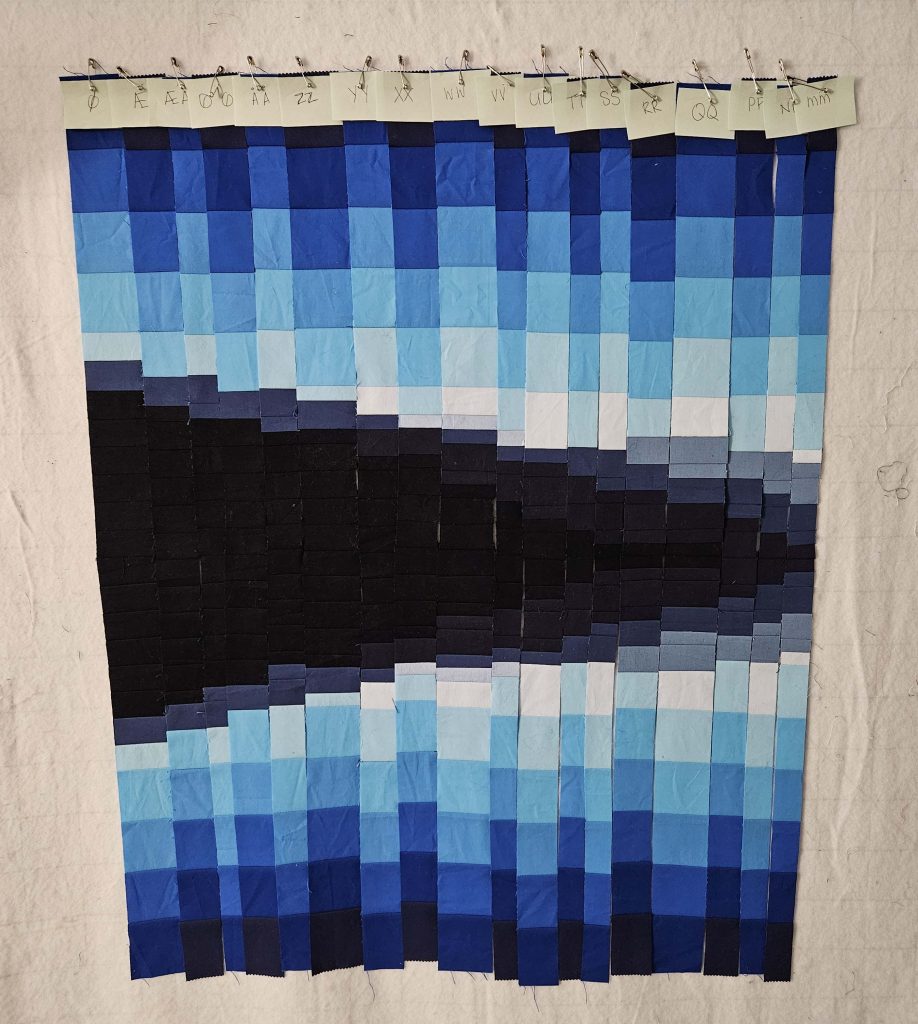
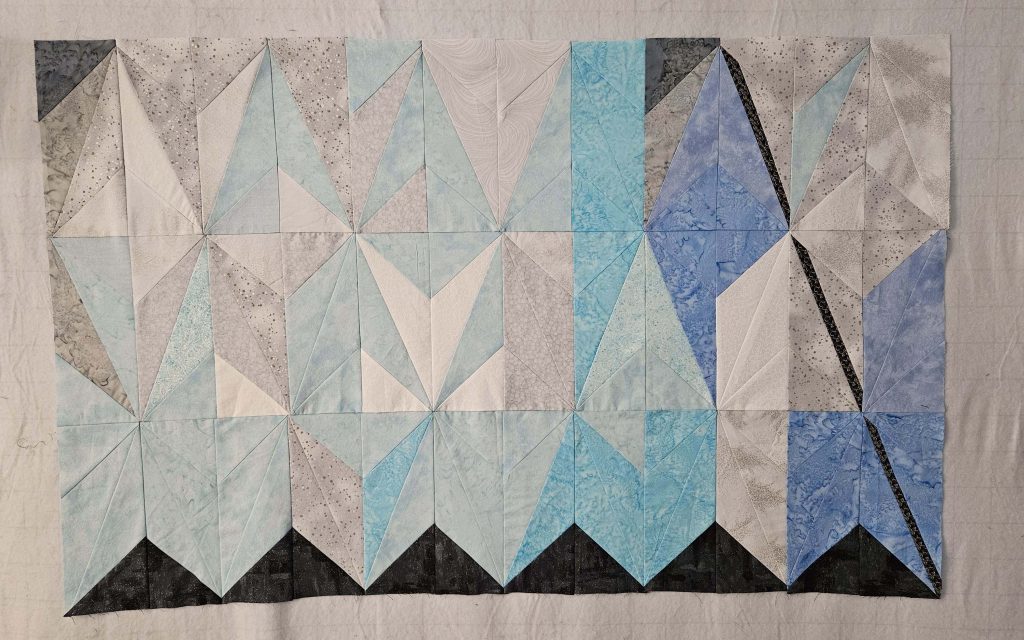
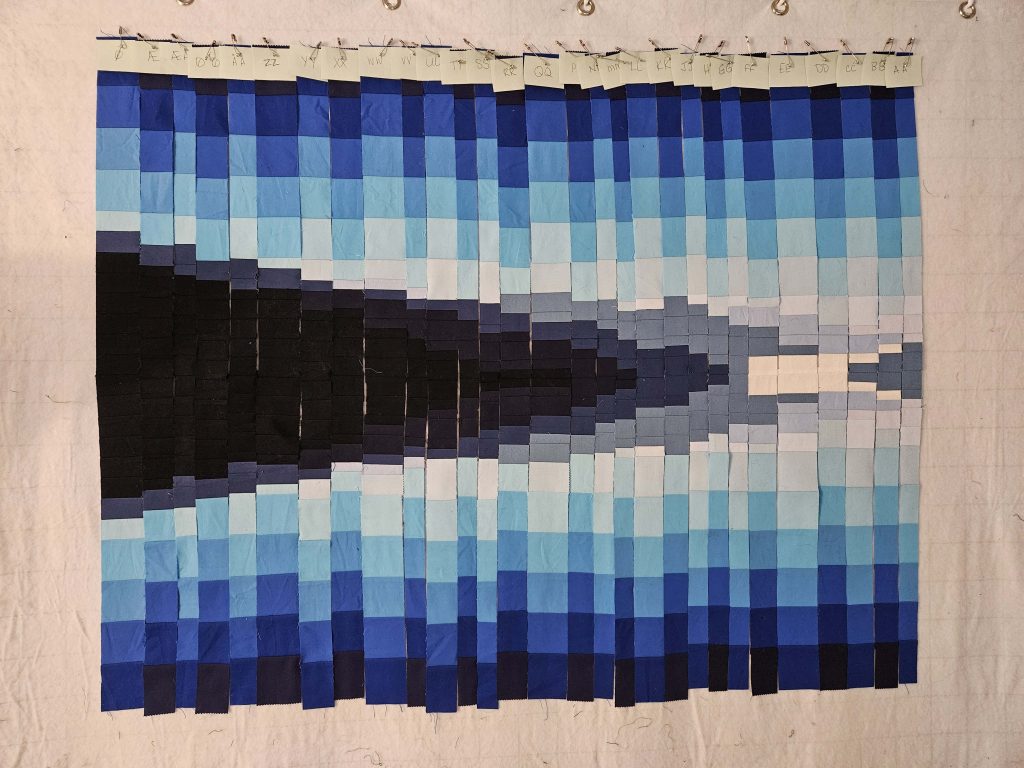
In between loads of laundry today, I was able to get to the halfway point of the College Fjord quilt. And now I’m at a bit of a standstill.

Some notes on what has changed since the last picture:

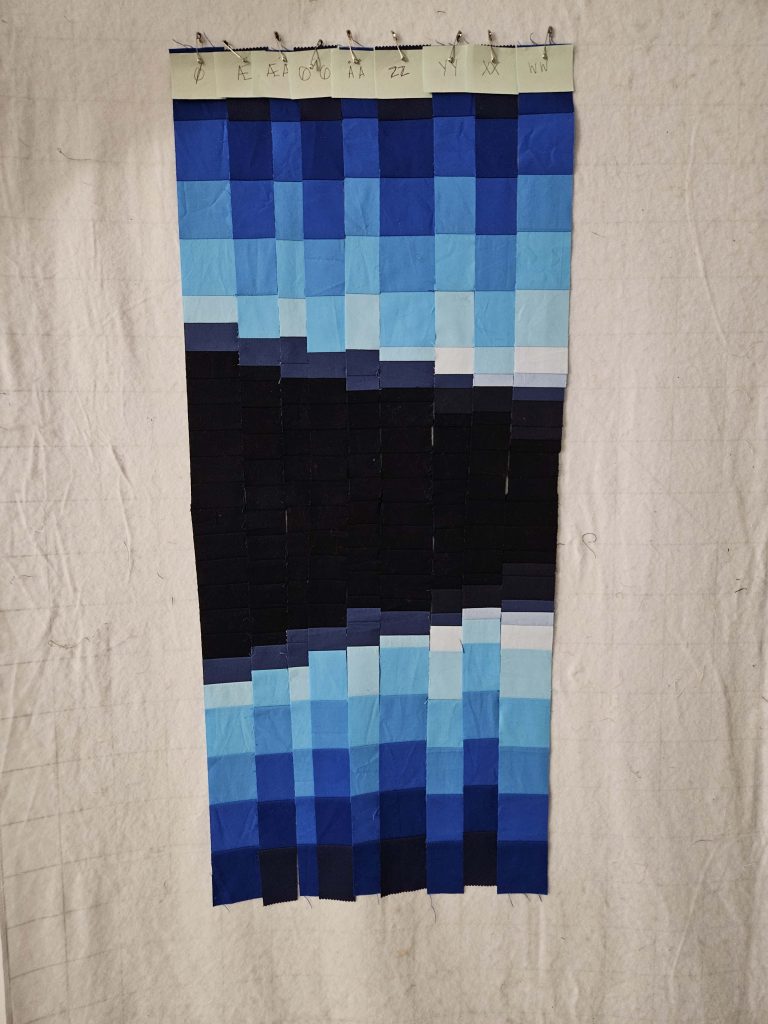
  • I switched out one of the blues. In this image, in the seventh column from the left, it’s the light sky blue just above the darker mountain blue. The color that was originally there was a slightly lighter sky blue – that color is now the next sky blue down. It was a pain in the ass to switch it out, but I like this one much better.
  • I decided that it didn’t make a difference that some of the lightest sky blues are nearly indistinguishable from the lightest mountain blues. There is definitely a difference if you look closely, but when you look at the overall image, they sort of blend together. And you know, what? The mountains in the original image sort of blend into the sky, too. So I’m not going to sweat it.
  • The columns starting with KK (you can see the Post-It notes with the column label at the top), going to the right, were done with a slightly different, much faster process than the ones before them. And interestingly enough, they are getting to be more consistent in size, so there are fewer seams that don’t line up, at least right now. It will be interesting to see if that holds when I begin sewing the columns together.

This is 29 columns. There are 54 total, so I’ve completed just over half of them. Top to bottom is 32”; that is the finished size (unless I decide to remain true to the image and cut 2” off of the bottom). The finished quilt will be 54” wide – currently, this is just under 40” wide with the columns laid out side-to-side like this. Each of these columns will lose half an inch when sewn together – seam allowances are a thing, after all. The narrowest columns are currently 1”. So when you’re looking at this image, keep in mind that when these 29 columns are sewn together, the piece will be 14” narrower than it is now.

Once I got to this point, I stared at it on my design wall for a long time. I had actually started running out of space on the design wall and had to move it up to the top so that I can fit the remaining part of the image below it.

I’m still debating how I’m going to build this quilt. Is it going to be a quilt-as-you-go kind of thing, or should I build the entire top and then attempt to quilt it? I briefly debated starting to sew the columns together today, which I cannot do if I want to quilt-as-I-go. I’m having trouble imagining the columns squished together, so I debated trying it out to see what it would look like. I’m desperately suppressing the urge to sew the columns together. I want to see what it’s going to look like in the end! But until I figure out how I want to build it, and especially quilt it, I don’t want to take any steps that would require even more use of the seam ripper.

Part of my hesitation is that I’m still making design decisions. I switched out a whole color and replaced it with a new one – TODAY. I’m still not sure if I’m happy with those white blocks on what is now the right side (will be the middle eventually). I can’t even start to quilt-as-I-go if there’s any chance that I might want to change things up later. And I can’t guarantee that I won’t change anything. I’m just not at that point.

I’m also still debating snow. Part of me likes it the way it is. Part of me want to put in snow. But if I do put in snow – do I follow the contours of the image? Or do I put snow in squared-off lines? The latter would be awful, but the former might ruin the bargello format (which arguably is holding on by a thread anyway).

Still planning on a water line. Still hanging on to mother-of-pearl buttons for the clouds. Need to find a pale yellow or two for the sun at some point. But things are moving along.

It’s 9:30pm…

…do you know where your seam ripper is? I do. My seam ripper and I are by now rather good friends. Math has never been a strong skill of mine. Add in seam allowances, and whoo boy. We’re all in for a rocky ride.

I’m beginning to remember why I said I’d never do another bargello quilt after the last (and only) one I did. Check that – I’ve always remembered why. I just also live with that unbridled optimism that says, “That was YEARS ago! Maybe you’ll be better at it this time!” If I could roll my eyes at my former self, I would.

Having said that, I am too far into the College Fjord quilt to give up on it now. And I really do like it – from a distance, as long as I don’t look too closely at the seams that don’t look like they’ll match up when they’re sewn together. Here it is, in its current state:

It really does resemble the photo! And I do think I’ll be able to use some of the wonkiness of the seams, especially those in the sky blues below the water line. I’ve always known – based on that bargello I did years ago – that there would be seams that didn’t line up. My plan right now is to make the ones above the water line align as much as I possibly can, but to let them be wonky below the water line.

Here’s why: reflections, even in mirror-like water, are never truly a mirror. If you look at the original image, there are bits of ice in the water, and there are lines where some breath of wind slid across that bit of surface, causing a tiny ripple. I was trying to figure out how to get that across in the quilt. Wonky seams actually create that illusion nicely, much to my surprise!

I’m getting to the center part of the quilt, where I might have to fudge a sky blue or two here and there, so we’ll see how that goes. The blues I have are just enough, and so far, I have gotten away with not using one of the very lightest sky blues I have. I’m hoping not to use it at all – I think it’s too close to the one next to it – but I suspect I might have to pull it out in a couple of places. But that is a project for another day…maybe over the upcoming holiday weekend?

At this point in time, I think I have enough of a proof of concept that the bargello construction works for this kind of image, so I may begin to source fabrics for the “Hus Ved Havet” quilt. More on that to come!

I Might Be Onto Something

I think I got this!

Over this past weekend, I had a full day to spend in the sewing room, so I started out working on a very overdue gift, but then had some time left over. I started sewing more of the double-wide strips, and I took out some of the lighter sky blues and replaced them with darker sky blues. Again, mistakes were made, decisions were reversed, math was done incorrectly, and the seam ripper got a workout.

After sewing four more of the double-wide strips, I decided I needed to see how they looked cut in half and mirrored. Ignoring the fact that there are regularly things that don’t line up (‘cause I’m me), I’m actually really pleased with how this looks so far.

I feel like it’s actually starting to look like some mountains with a beautifully clear sky above, reflected in some very clear water. Which, frankly, is what the original picture is. There’s a lot more to the picture, though.

While I am happy that it’s starting to look like it’s supposed to, there are still some things that need to get resolved:

  • The current plan is to do quilt-as-you-go quilting on this, with the strips being sewn together at the same time that they’re being sewn to the batting and backing. But I may have to throw that out, depending on what my solutions to these other issues are.
  • What, exactly, will I do for a water line? I was going to completely ignore it, but the more I look at this, the more I think that it needs to be there. There is, in fact, a clear water line in the original image. SO…white or blue? How will it be created? (Current thinking on that is embroidery floss, but I’m still contemplating.)
  • Same thoughts, only for snow. There is snow on top of almost all of the mountains. I would like to add that in somehow. The jury is completely out on that one…no idea how that’s going to go off, especially with the quilt-as-you-go method.
  • Look closely at the rightmost two strips in the picture. The lightest mountain blue – which is the second-lightest of all of the mountain blues – almost disappears against the sky blues. If my solution for the snow does not solve that issue, I’m going to have to figure out how to set those off so that the lightest mountains don’t just blend into the lightest sky colors. Although…if you look at the original image, the furthest mountains do just sort of blend into the sky. Again, not quite sure what I’m going to do about that.

I have some work ahead of me – design choices as well as a LOT of sewing. I did cut and sort the remaining mountain blue pieces – I have 45 little piles of mountain blue strips pinned and labeled with the column letter, ready to go. I may try to get some of them sewn tonight, in fact.

I’ve completed nine of 54 strips. As my friend Joe said when I was telling him about it, “You’re almost 20% done!” Dude, that did not help.

And the Sewing Begins

I found sky blues. Seven of them, to be exact. A new-to-me quilt store in Rhode Island had a whole wall of solids, and I was able to come up with the blues I needed. They have all been washed and cut, and I have sewn all of the sky blue strips together. I actually really like the shading of the seven sky blues in order. I would have liked to have more subtle transitions from one fabric to the next, but barring my ability to find an appropriate blue ombre (no one seems to think this exists), I’m going to have to claim artistic license here.

The sky blues, once I found them, were easy. They go in the same order every time, so I was able to just sew them together in strips. (Strip piecing FTW!) It’s those mountain blues that are going to be the death of me. I sewed five of them together. It took me a whole evening. Granted, mistakes were made, and the seam ripper got a workout. But the picture below shows one evening’s worth of work.

(I swear the darks are really blue and not black!)

Five down, fifty left to go!

The pieces you see are double wide – I have not yet cut them in half to produce the mirror image that goes below the waterline. So this is not what the final thing will look like. But it is definitely an approximation. 

I am not 100% sure I’m happy with it yet. I feel like I need darker sky blues (which I do have), and I feel like it’ll look very different once I cut these pieces in half. I need some time (maybe this weekend?) when I can devote a day to just working on this and fiddling with it while I keep track of what works and what doesn’t.

One thing I am rather pleased with is the clear difference between the mountain blues and the sky blues. I was worried that there wouldn’t be a clear difference, but I absolutely see it. I think it also helps that the sky blues are two-inch blocks while the mountain blues are one-inch blocks. I think the contrast between the size and the color is very clear, at least here, with these blues. My opinion may change once I get into the center of the image, where the blues are lighter and it will be harder to tell them apart when they’re next to each other. But that is a long time away. I’ll get there eventually, but at the rate I’m going, it’ll be well into next year.

One of these days, my life will calm down, I’ll get my weekends back, and I’ll have time to really dig into this and get into a rhythm to get a lot done. One of these days…

Two Steps Forward…

I put the border on the abstract iceberg quilt. And then I put it up on the design wall, and I stared at it for a bit. And I went and did something else for a while, waited a couple of days, and then came back and stared at it a little while longer. I even took it with me quilt shop hopping this past weekend (the All New England Quilt Shop Hop is on!) and looked to see if I could find something that I liked better for the borders, but noooo. It just…didn’t work. I even disliked the extension of the water as the bottom border. 

People who make all of the decisions about a quilt – fabric, borders, backing, binding – all at once utterly fascinate me. I have a pretty good visual imagination. I can see pictures in my head, and they usually look reasonably like reality. I can see all of the fabrics of a quilt top together. Sometimes I’m off – I was once in the middle of making a pieced quilt top and put some of the pieces up on the design wall to see how it would look, and I realized something was off. I ended up changing just one of the fabrics, and it was like night and day. So much better with that one different fabric! But for the most part, I pick the fabrics and I can see what it will look like in the end. To also pick the borders and the backing and the binding at the same time? Rarely. I want to see the whole thing together before I try to imagine a frame for it (which is what the border is). The binding usually ends up being the same as the border or very close to it, so I can’t decide that yet. And my ADHD brain doesn’t deal with the backing (which is out-of-sight-out-of-mind) until I get to the point where I need to quilt it – then I realize I don’t have it yet. My process bites me in the butt occasionally, but it mostly works. 

I came back home after shop hopping, put the abstract iceberg quilt back on the wall, and stared at it again. And the longer I looked at it with the borders I’d chosen, the less I liked it still. So I spent tonight with a seam ripper and a halfway decent movie and took all of the borders off. Made a colossal mess, too, while I was at it. But I think I’m just going to quilt it without the borders and be done with it. I found a shimmery white that I was planning to use as the binding, and I think I’ll still use that, but the borders have been nixed entirely. And I’m actually really happy with that. It took me a while to get there, but that’s the process!

Also in front of a movie or two this weekend after I was done shop hopping, I finished up the Tracy Arm quilt. Here it is, in all of its finished glory!

Once I clean all of the cat fur off of it, go buy a couple of dowels to use to hang it with, and figure out where to hang it, I’ll do something with it! As of right now, I’m not sure where I should put it. (For reference, I still have several cross stitch projects – professionally framed, of course – and several other pieces of art that I haven’t hung up yet despite having lived here for a little over two years. This could take some time.)

A Productive Weekend, Part II

Besides the Horseshoe Canyon quilt, I was also able to work on two other quilts this past weekend. First, I quilted the Tracy Arm quilt. Because this quilt is so small and mostly applique that has been top-stitched, it didn’t need a ton of quilting, and I actually did it with the clear monofilament on top with white bobbin thread so that it’s there but it doesn’t show at all. I just quilted a couple of lines along the edges of the water, the iceberg, and some of the mountains, and then I went around the outside of the inner border. Pretty straight-forward quilting that, as I’ve discussed, doesn’t interfere with the image in any way. Once the quilting was done, I was also able to sew the binding on; the last element that needs to be finished is the hand-sewing of the binding. When it’s done, I’ll post a picture.

The last part of my productive weekend was finishing the abstract iceberg quilt top. I was able to slog through the remainder of the block piecing, and then once that was done, it was a fairly easy process to just sew the blocks together. I did end up with a couple of pieces that were upside down when I sewed them together – I need to remember that for next time I do this pattern. Fortunately, I caught those errors quickly and was able to fix them easily, and I learned how not to make the mistake again.

a quilt top that mimics the colors and textures of an iceberg

The issue that came up once I finished piecing the blocks together – which I am very pleased with! – was trying to figure out what to do for a border. I briefly toyed with the idea of just quilting it without a border and then binding it like that, but the more I thought about it (and tried to imagine it in my head), the less I liked that idea.

The modern world has made it easy to seek design input from others, and someone I regularly seek input from is my mother. It is not at all unusual for me to get stuck on a piece and take a picture of it to text to her, usually followed up by a phone call where we talk about what I’ve considered, what direction (if any) I’m leaning toward, and what she thinks about where I should go from here. I don’t always take her advice, but usually something she says gets me unstuck in some way. But this time, even she said she wasn’t sure what she would do for the border of this quilt.

We did agree on one thing – the border couldn’t be one of the fabrics already used in the quilt. To use one of the fabrics from the iceberg pieces would have brought too much emphasis to that fabric in the iceberg, and that would have been weird. We disagreed on where to go from there. Knowing that my plan is to put this quilt on a navy blue wall in my living room, I didn’t want the border of the quilt to be dark – it would just blend into the wall if I did that, and then what’s the point? So the border needed to be either light or bright. We toyed with the ideas of darker teals or grays. My initial idea was to go with a white of some type – I didn’t know what type, though. Mom hated that idea. I later texted her two border possibilities from my stash, both of which she rejected as being too “busy.”

I ended up at the fabric store the next day, where the owner reminded me that the border doesn’t have to be the same fabric all the way around. I ended up with one fabric – a darker teal with some blue in it – for two sides, a metallic-y white for a third side, and more of the water fabric (which I had at home) for the bottom. I haven’t yet attached it all, but we’ll see what it looks like when that happens. The plan is to use the metallic-y white for the binding as well. So the plan I ended up with is really a combination of all of the ideas we had, which probably makes the most sense given that neither I nor my mother had strong feelings about any of the single-fabric plans.

Yet again, the plan for this one is stitch-in-the-ditch quilting on my domestic machine, but this one is a far more reasonable size. Still lots more work to be done – I’ll post a final picture when it all comes together! I have to say, I’m really looking forward to posting the final picture on Instagram and tagging Oscar so he can see it.

A Productive Weekend, Part I

There aren’t many weekends that I can spend all or part of both days in my sewing room, but this was one of them. The entire day Saturday and some of the day Sunday were spent working on various items. With some bonus time on Friday evening, I was able to layer the Horseshoe Canyon quilt with backing, batting, and top. That is ready to be quilted, and I’ve got a good idea how I’m going to quilt it – I just need to gather up the courage to attempt it with my domestic machine. I don’t normally quilt projects this size on my own, honestly. But in this case, the quilting will be stitch-in-the-ditch, and it involves either straight or almost straight lines, so I think I can handle it.

The question of quilting for these projects is an interesting one, and it goes back to the thoughts I had about quilting the Crater Lake image. Quilting is a necessity for these projects – after all, it’s not a quilt unless it has those three layers sewn together! In a traditionally pieced project, the quilting is an opportunity to enhance the piecing. Let’s take another project I’ve got started (but have clearly shunted aside for the moment) as an example: Getting to Know Hue.  I’ve been in love with this project since I first saw it hanging in the quilt shop where I got all of the block-of-the-month patterns and fabrics, but it’s a very different type of project. I am actually planning to leave out the applique in the corners of the center block with the star. I’m not sure what I’m going to put in there in its place, but one of the options is to work with the long arm quilter (because let’s be honest – I will not quilt this on my domestic machine!) to do something design-wise with the quilting rather than trying to piece something together. In this type of project, the quilting has a chance to enhance the piecing – to bring out the colors and enliven the background. To quilt this project with a stitch-in-the-ditch method would be a TRAVESTY. Could it be done? Sure. But why would you do it that way?!

These picture quilts, though, are very different. There’s no background fabric in the same way that there is in the Getting to Know Hue quilt. Everything is part of the image at a higher level than the “main fabrics” of a traditionally pieced quilt. To quilt these images any way other than stitch-in-the-ditch takes away from the image, unless the stitching is meant to be part of the image in some way. (Like quilting around bits of the tree in the Crater Lake quilt. Doing that enhanced an element of the image.) But to recreate an image, even in the abstract, such as I did with the Horseshoe Canyon quilt using fabrics to mimic elements of the image renders intricate quilting unnecessary. All of the image elements are there already – in the fabric. Why try to distract from that with quilting?

The question is: does the quilting enhance the quilt, or does it distract from the quilt? Intricate quilting on a traditionally pieced quilt enhances it, if it’s done right. Intricate quilting on these picture quilts that I’m working on, in my humble opinion, would detract from them – at least for the ones I’ve done so far.

And so the Horseshoe Canyon quilt sits until I can gather up the courage to shove it into my domestic machine to do some plain ol’ stitch-in-the-ditch.

Another Busy Day

My machine is home! It was gone for all of four days. It was a timing issue and covered under warranty, so yay! I picked it up at the sewing center yesterday, and it was all ready for me to go first thing this morning.

Today was a busy day. I hung the national park quilt, which took a lot longer than I thought it would because of things I couldn’t find (hello, ADHD). I’ve been meaning to do that for a while – I just got sick of looking at a blank wall and having my voice echo in the hallway. So that’s done.

I started in on the foundation paper piecing for the abstract iceberg quilt after that. It’s been such a long time since I last did any foundation paper piecing that I lost of my add-a-quarter ruler, probably somewhere in the move to my current house (which happened in May of 2022, so a little over two years ago). So…the trip to the store to get a new one happened. Fortunately the closest store is two miles up the street and open on Sundays. I was thinking I might find the old one once I bought a new one, but noooo.

Six of the 36 blocks (18 A blocks and 18 B blocks) are now done. Two of them got done twice ‘cause I wasn’t paying attention and screwed something up. Fortunately, I use David Sirota’s No More Tears paper piecing method, so the paper wasn’t destroyed and could easily be reused to do the blocks the right way. (I did find the instructions for that method in a project from the class that I took with David well before my 2022 move…which still isn’t done. And no, the ruler wasn’t in there. It was the first place I looked.) It’s slower going than I would like, but given my propensity to screw up, I will take my own sweet time, thankyouverymuch. I figure if I spend a couple of hours on it when I have a free evening, I might have it done fairly quickly. But then again, all of my other hobbies (chorus, photo club, quilt guild, etc.) are starting up again with the start of the school year, so who knows.

When I got bored with that (hello again, ADHD), I sewed the borders onto the Horseshoe Canyon quilt. I like it SO MUCH BETTER with the borders on it! I thought about putting the layers together to quilt it but discovered that I hadn’t gotten quite enough backing fabric because I forgot to add in the width of the borders. So this necessitates adding a 10” strip down the middle of the backing fabric, which I was just not going to get done tonight. Maybe tomorrow. But I am so pleased with the quilt now that it has borders on it. The border is a black batik with a navy blue pattern on it, so it looks solid black in low light, and it just helps to balance the dark greens in the middle. I promise to post a picture of it when it’s quilted and bound.