Paper Piecing the Hard Way

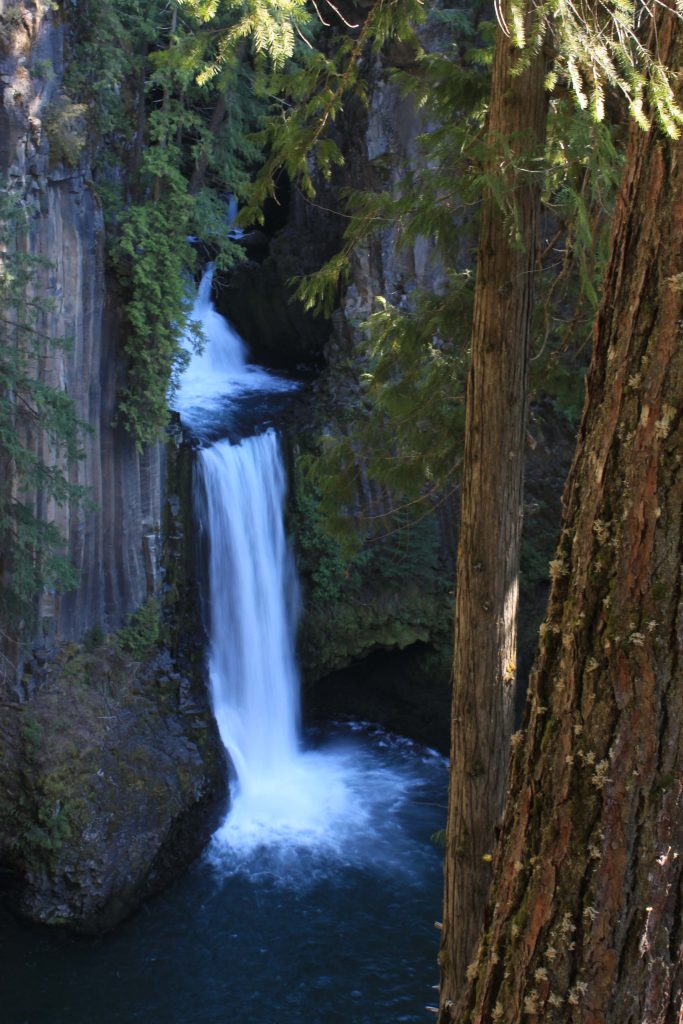
On Saturday, I got out the projector and some large pieces of paper and outlined three potential quilts – the Oregon waterfall and the two bargello quilts. I’m pretty sure I have all of the fabrics for the Oregon waterfall quilt, but I haven’t yet started putting that one together yet. I think I need a full day for that one, so I don’t foresee that happening anytime soon. (I have some pretty busy non-quilting weekends coming up over the next few weeks.)

This was an interesting process. First, trying to trace an image that disappears into shadow if you stand in the wrong place is a pain in the ass. Second, trying to line up a ruler – in this case, a yardstick – with a projected image is actually a lot harder than I thought it would be. I mean, how hard could it be? Line up the straight edge of the yardstick with the straight edge of the image. So, so much harder than it looks. One side of the image was shorter than the yardstick, so that one was easy. But the other was not, so I needed a waypoint. I am 100% sure none of the horizontal lines I drew are straight. There’s no way.

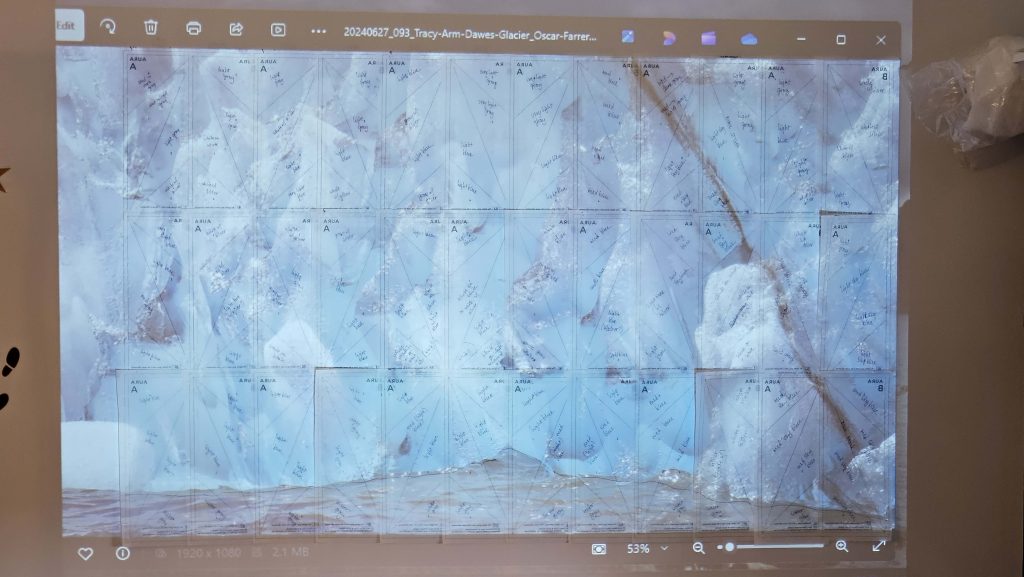
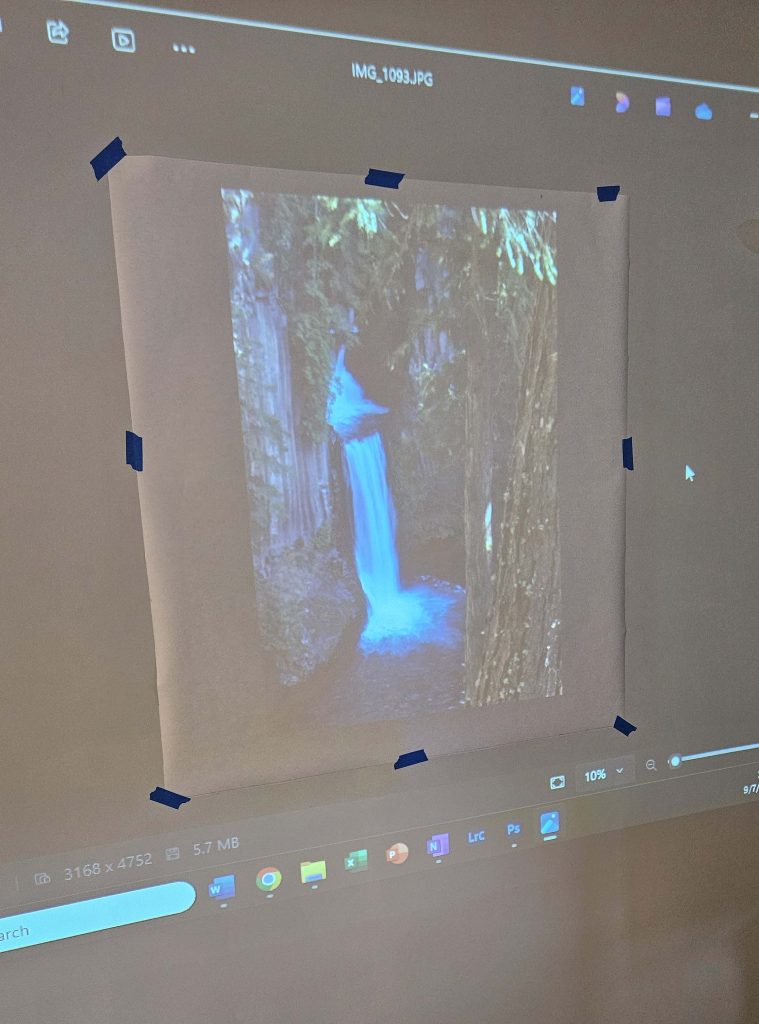
The Oregon waterfall image was far easier than the other two. After all, it was just a matter of outlining the different areas of the image that would be covered by different areas of fabric. For the most part, this was straightforward. I drew lines, I made notes, I labeled different parts of the image. Now all I have to do is make all of the template pieces and put the thing together. That is a project for another weekend.

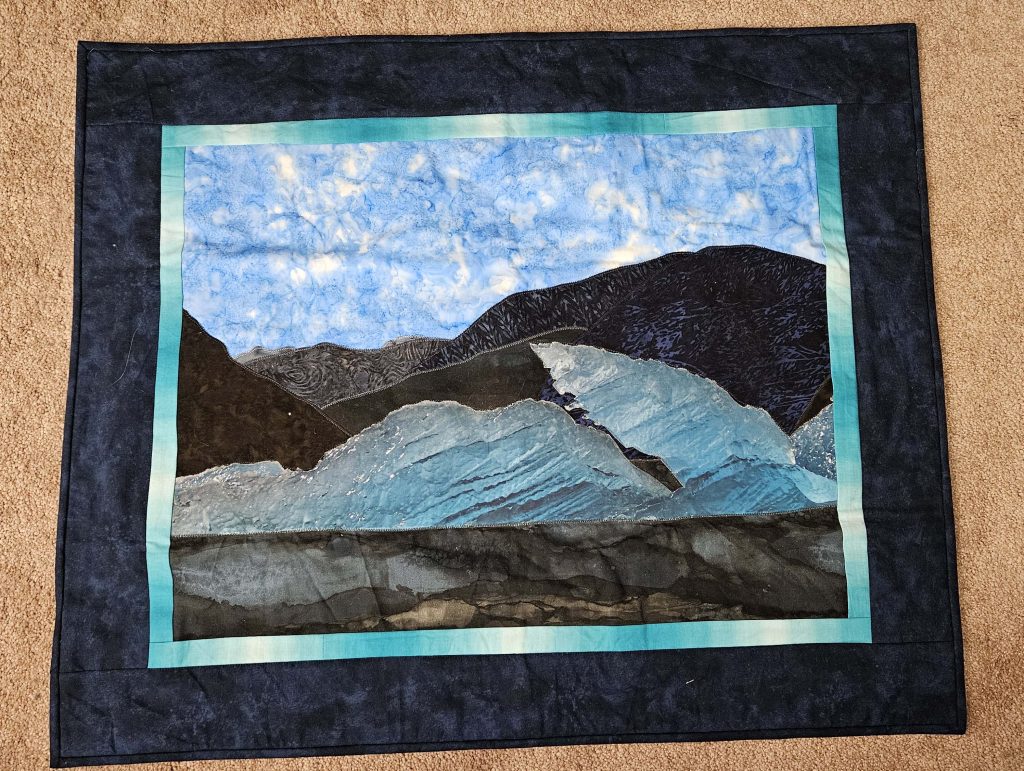
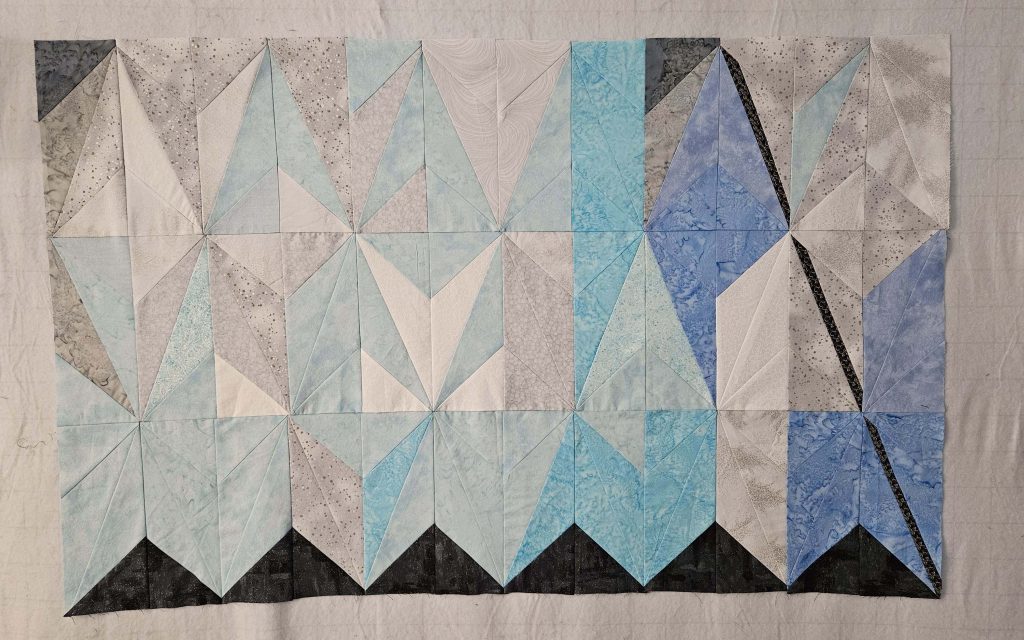
The bargello quilts were another story. I drew out both of them because I had the projector on and it was just easier to do both while my brain was immersed in the logistics of them. All I really did was draw a rudimentary grid, labeling the water line and providing some structure for the rest of it, then outline each image as if I was going to do it with the technique I’ll use on the Oregon waterfall image. Each of the bargello quilts will be about 30” x 50”, and I was a little surprised to find that some areas of the images were much smaller than I’d imagined they would be when projected on the wall. I’m not quite sure how well that will translate to the bargello pattern, but I haven’t yet overlaid the full horizontal grid lines over it yet to see how well it’ll work.

Now that I have the images on paper, I can start to produce those grids to see whether or not what I have in my head will actually work!

Two Steps Forward…

I put the border on the abstract iceberg quilt. And then I put it up on the design wall, and I stared at it for a bit. And I went and did something else for a while, waited a couple of days, and then came back and stared at it a little while longer. I even took it with me quilt shop hopping this past weekend (the All New England Quilt Shop Hop is on!) and looked to see if I could find something that I liked better for the borders, but noooo. It just…didn’t work. I even disliked the extension of the water as the bottom border. 

People who make all of the decisions about a quilt – fabric, borders, backing, binding – all at once utterly fascinate me. I have a pretty good visual imagination. I can see pictures in my head, and they usually look reasonably like reality. I can see all of the fabrics of a quilt top together. Sometimes I’m off – I was once in the middle of making a pieced quilt top and put some of the pieces up on the design wall to see how it would look, and I realized something was off. I ended up changing just one of the fabrics, and it was like night and day. So much better with that one different fabric! But for the most part, I pick the fabrics and I can see what it will look like in the end. To also pick the borders and the backing and the binding at the same time? Rarely. I want to see the whole thing together before I try to imagine a frame for it (which is what the border is). The binding usually ends up being the same as the border or very close to it, so I can’t decide that yet. And my ADHD brain doesn’t deal with the backing (which is out-of-sight-out-of-mind) until I get to the point where I need to quilt it – then I realize I don’t have it yet. My process bites me in the butt occasionally, but it mostly works. 

I came back home after shop hopping, put the abstract iceberg quilt back on the wall, and stared at it again. And the longer I looked at it with the borders I’d chosen, the less I liked it still. So I spent tonight with a seam ripper and a halfway decent movie and took all of the borders off. Made a colossal mess, too, while I was at it. But I think I’m just going to quilt it without the borders and be done with it. I found a shimmery white that I was planning to use as the binding, and I think I’ll still use that, but the borders have been nixed entirely. And I’m actually really happy with that. It took me a while to get there, but that’s the process!

Also in front of a movie or two this weekend after I was done shop hopping, I finished up the Tracy Arm quilt. Here it is, in all of its finished glory!

Once I clean all of the cat fur off of it, go buy a couple of dowels to use to hang it with, and figure out where to hang it, I’ll do something with it! As of right now, I’m not sure where I should put it. (For reference, I still have several cross stitch projects – professionally framed, of course – and several other pieces of art that I haven’t hung up yet despite having lived here for a little over two years. This could take some time.)

A Productive Weekend, Part II

Besides the Horseshoe Canyon quilt, I was also able to work on two other quilts this past weekend. First, I quilted the Tracy Arm quilt. Because this quilt is so small and mostly applique that has been top-stitched, it didn’t need a ton of quilting, and I actually did it with the clear monofilament on top with white bobbin thread so that it’s there but it doesn’t show at all. I just quilted a couple of lines along the edges of the water, the iceberg, and some of the mountains, and then I went around the outside of the inner border. Pretty straight-forward quilting that, as I’ve discussed, doesn’t interfere with the image in any way. Once the quilting was done, I was also able to sew the binding on; the last element that needs to be finished is the hand-sewing of the binding. When it’s done, I’ll post a picture.

The last part of my productive weekend was finishing the abstract iceberg quilt top. I was able to slog through the remainder of the block piecing, and then once that was done, it was a fairly easy process to just sew the blocks together. I did end up with a couple of pieces that were upside down when I sewed them together – I need to remember that for next time I do this pattern. Fortunately, I caught those errors quickly and was able to fix them easily, and I learned how not to make the mistake again.

a quilt top that mimics the colors and textures of an iceberg

The issue that came up once I finished piecing the blocks together – which I am very pleased with! – was trying to figure out what to do for a border. I briefly toyed with the idea of just quilting it without a border and then binding it like that, but the more I thought about it (and tried to imagine it in my head), the less I liked that idea.

The modern world has made it easy to seek design input from others, and someone I regularly seek input from is my mother. It is not at all unusual for me to get stuck on a piece and take a picture of it to text to her, usually followed up by a phone call where we talk about what I’ve considered, what direction (if any) I’m leaning toward, and what she thinks about where I should go from here. I don’t always take her advice, but usually something she says gets me unstuck in some way. But this time, even she said she wasn’t sure what she would do for the border of this quilt.

We did agree on one thing – the border couldn’t be one of the fabrics already used in the quilt. To use one of the fabrics from the iceberg pieces would have brought too much emphasis to that fabric in the iceberg, and that would have been weird. We disagreed on where to go from there. Knowing that my plan is to put this quilt on a navy blue wall in my living room, I didn’t want the border of the quilt to be dark – it would just blend into the wall if I did that, and then what’s the point? So the border needed to be either light or bright. We toyed with the ideas of darker teals or grays. My initial idea was to go with a white of some type – I didn’t know what type, though. Mom hated that idea. I later texted her two border possibilities from my stash, both of which she rejected as being too “busy.”

I ended up at the fabric store the next day, where the owner reminded me that the border doesn’t have to be the same fabric all the way around. I ended up with one fabric – a darker teal with some blue in it – for two sides, a metallic-y white for a third side, and more of the water fabric (which I had at home) for the bottom. I haven’t yet attached it all, but we’ll see what it looks like when that happens. The plan is to use the metallic-y white for the binding as well. So the plan I ended up with is really a combination of all of the ideas we had, which probably makes the most sense given that neither I nor my mother had strong feelings about any of the single-fabric plans.

Yet again, the plan for this one is stitch-in-the-ditch quilting on my domestic machine, but this one is a far more reasonable size. Still lots more work to be done – I’ll post a final picture when it all comes together! I have to say, I’m really looking forward to posting the final picture on Instagram and tagging Oscar so he can see it.

A Productive Weekend, Part I

There aren’t many weekends that I can spend all or part of both days in my sewing room, but this was one of them. The entire day Saturday and some of the day Sunday were spent working on various items. With some bonus time on Friday evening, I was able to layer the Horseshoe Canyon quilt with backing, batting, and top. That is ready to be quilted, and I’ve got a good idea how I’m going to quilt it – I just need to gather up the courage to attempt it with my domestic machine. I don’t normally quilt projects this size on my own, honestly. But in this case, the quilting will be stitch-in-the-ditch, and it involves either straight or almost straight lines, so I think I can handle it.

The question of quilting for these projects is an interesting one, and it goes back to the thoughts I had about quilting the Crater Lake image. Quilting is a necessity for these projects – after all, it’s not a quilt unless it has those three layers sewn together! In a traditionally pieced project, the quilting is an opportunity to enhance the piecing. Let’s take another project I’ve got started (but have clearly shunted aside for the moment) as an example: Getting to Know Hue.  I’ve been in love with this project since I first saw it hanging in the quilt shop where I got all of the block-of-the-month patterns and fabrics, but it’s a very different type of project. I am actually planning to leave out the applique in the corners of the center block with the star. I’m not sure what I’m going to put in there in its place, but one of the options is to work with the long arm quilter (because let’s be honest – I will not quilt this on my domestic machine!) to do something design-wise with the quilting rather than trying to piece something together. In this type of project, the quilting has a chance to enhance the piecing – to bring out the colors and enliven the background. To quilt this project with a stitch-in-the-ditch method would be a TRAVESTY. Could it be done? Sure. But why would you do it that way?!

These picture quilts, though, are very different. There’s no background fabric in the same way that there is in the Getting to Know Hue quilt. Everything is part of the image at a higher level than the “main fabrics” of a traditionally pieced quilt. To quilt these images any way other than stitch-in-the-ditch takes away from the image, unless the stitching is meant to be part of the image in some way. (Like quilting around bits of the tree in the Crater Lake quilt. Doing that enhanced an element of the image.) But to recreate an image, even in the abstract, such as I did with the Horseshoe Canyon quilt using fabrics to mimic elements of the image renders intricate quilting unnecessary. All of the image elements are there already – in the fabric. Why try to distract from that with quilting?

The question is: does the quilting enhance the quilt, or does it distract from the quilt? Intricate quilting on a traditionally pieced quilt enhances it, if it’s done right. Intricate quilting on these picture quilts that I’m working on, in my humble opinion, would detract from them – at least for the ones I’ve done so far.

And so the Horseshoe Canyon quilt sits until I can gather up the courage to shove it into my domestic machine to do some plain ol’ stitch-in-the-ditch.

Thoughts in the Shower

I really need to learn to keep a notepad near the shower so I can take notes on things that I think of while I’m in there. While half of my brain is occupied by the repetitive (and boring) act of showering, the other half gets to wander far afield. Sometimes it focuses on work that I have upcoming. Sometimes it repeats conversations I’ve recently had, heavily notated with the things I wish I’d said at the time. Sometimes it hits on five different topics, so that I forget about the first one by the time I step out of the tub. Yesterday, I visualized and planned quilts.

I won’t take you through the whole thought process that went into this, but I was thinking about this whole idea of using a published pattern, or a traditional way of piecing, and trying to build an image around it. Because I’m me and I know that I get bored easily, the established pattern needs to be easy – something that’s not terribly intricate and doesn’t involve absurd amounts of planning. (For some people, what I’ve already done for the abstract iceberg quilt constitutes “absurd amounts of planning.” The definition of “absurd” is simply “something I don’t wanna do.”) Side note: along this same line of thinking, I’ve been trying to figure out a way to incorporate a log cabin pattern into one of these things, but very few of my images lend themselves well to squares, or even rectangles. But I digress.

Somehow, the image of a bargello quilt came into my head. (Yes, I hear you yelling “I thought you said you DIDN’T want to do absurd amounts of planning!” Bear with me.) And I must admit, I got a little excited at the prospect of figuring out a way to do one of these images in the abstract with bargello. I mean, think about it. Bargello curves. It moves. Like a picture, it is designed for your eyes to travel across it. It is the perfect quilty medium for interpreting hills and mountains and movement.

I have done one bargello quilt before. It was a small table runner, and I swore I’d never do one again. Even though my piecing has become more consistent over the years, it’s still just inconsistent enough that I can pretty much guarantee that very few seams will match on any bargello quilt I make. But perhaps, with a bargello quilt that imitates nature, matching seams isn’t really the point. Let’s be honest – who’s going to notice when it’s hanging on a wall?

I’m trying to imagine myself attempting bargello on a larger scale. I’m not going to lie – it mostly terrifies the stuffing out of me. But I have not just one but two images that would be pretty much perfect to attempt using this method. One is a mirror image picture – mountains and skies over mirror-smooth water. (I’m DYING to do something with this image and was kicking myself that I hadn’t yet figured out a way to do it well.) The other is another scene from the Lofoten Islands in Norway that just contains a lot of that kind of undulating movement that bargello quilts do spectacularly well.

So I will most likely be breaking my oath to myself never to attempt another bargello quilt. May the Flying Spaghetti Monster have mercy on my soul.

Another Busy Day

My machine is home! It was gone for all of four days. It was a timing issue and covered under warranty, so yay! I picked it up at the sewing center yesterday, and it was all ready for me to go first thing this morning.

Today was a busy day. I hung the national park quilt, which took a lot longer than I thought it would because of things I couldn’t find (hello, ADHD). I’ve been meaning to do that for a while – I just got sick of looking at a blank wall and having my voice echo in the hallway. So that’s done.

I started in on the foundation paper piecing for the abstract iceberg quilt after that. It’s been such a long time since I last did any foundation paper piecing that I lost of my add-a-quarter ruler, probably somewhere in the move to my current house (which happened in May of 2022, so a little over two years ago). So…the trip to the store to get a new one happened. Fortunately the closest store is two miles up the street and open on Sundays. I was thinking I might find the old one once I bought a new one, but noooo.

Six of the 36 blocks (18 A blocks and 18 B blocks) are now done. Two of them got done twice ‘cause I wasn’t paying attention and screwed something up. Fortunately, I use David Sirota’s No More Tears paper piecing method, so the paper wasn’t destroyed and could easily be reused to do the blocks the right way. (I did find the instructions for that method in a project from the class that I took with David well before my 2022 move…which still isn’t done. And no, the ruler wasn’t in there. It was the first place I looked.) It’s slower going than I would like, but given my propensity to screw up, I will take my own sweet time, thankyouverymuch. I figure if I spend a couple of hours on it when I have a free evening, I might have it done fairly quickly. But then again, all of my other hobbies (chorus, photo club, quilt guild, etc.) are starting up again with the start of the school year, so who knows.

When I got bored with that (hello again, ADHD), I sewed the borders onto the Horseshoe Canyon quilt. I like it SO MUCH BETTER with the borders on it! I thought about putting the layers together to quilt it but discovered that I hadn’t gotten quite enough backing fabric because I forgot to add in the width of the borders. So this necessitates adding a 10” strip down the middle of the backing fabric, which I was just not going to get done tonight. Maybe tomorrow. But I am so pleased with the quilt now that it has borders on it. The border is a black batik with a navy blue pattern on it, so it looks solid black in low light, and it just helps to balance the dark greens in the middle. I promise to post a picture of it when it’s quilted and bound.

Not What I Thought I’d Be Working On

A couple of blog posts ago, I talked about what I thought my next project would be, now that I’ve finished the Tracy Arm quilt. Well, that one has stalled out. I still don’t have a definitive image of what it might look like in my head, and when I really looked at it to start to source fabrics for it, all I really saw was green and white, and two colors do not an interesting quilt make. So I have, for the moment at least, tossed that one aside in favor of another one that is similar but has more color and texture variation.

The more I look at this one, the more I think I will like the challenge of it. I’m going to use the puzzle-piece-layering method that I learned from Trudy, but this will be the first time I use it on a piece that does not have a sky, and that idea sort of intrigues me. First, I have to figure out what the pieces will be, then I have to find the fabrics. (If I’m honest, I’ve already found a couple of them.) I think this one will be just a little smaller than the Tracy Arm quilt but larger than the boring Norway one, and of course, it’s a portrait orientation image rather than a landscape orientation. So it poses some interesting challenges.

What’s going to be a real challenge for me is recreating the waterfall. I’ve got a couple of different fabrics that I want to try out to see what works. One is a little darker but already has the vertical lines in it; I may just have to embellish those lines with some thread painting (which, by the way, I still have not yet attempted with the Norway fisherman’s cottage image). The other fabric is lighter with some muted colors on it, but has no lines on it, so those will need to be created from scratch. So the question now is – is sewing going to recreate those smooth vertical lines of the waterfall? Or am I going to have to get more creative than that? And of course, all of it has to wait until I get my sewing machine back. *sigh*

Depending on how long it takes to hear what’s wrong with my sewing machine and get it fixed, I may start collecting fabrics for other projects soon as well.

Chipping Away at All of the Projects

I’ve been here, there, and everywhere over the last week or so, but I’ve been chipping away at the abstract iceberg quilt. First there was making a list of all of the colors of fabric that I identified when I labeled the foundation papers, and then figuring out how many of each of those pieces I would need. That, in turn, helped me figure out how much of each of the new fabrics I needed to get. Most of the fabrics were small amounts – I just needed one or two pieces here or there, not huge amounts. Then I went to get the fabrics that I needed.

After washing all of the fabrics, I started cutting the other night. Fortunately, the pieces I need for this quilt can be divided into two kinds – the piece for items 1 and 2, which are the same size, and the piece for items 3 and 4, which are a different size than items 1 and 2 but the same as each other. Fortunately, the strips of fabric I needed to cut were all the same! I’m still in the process of cutting up all of the fabrics I need and hoping I don’t get burned by the fact that some of the fabrics can be used on right and wrong side (read: batiks), but other fabrics not so much. I’ll deal with it…some other day.

The Tracy Arm quilt has also been moving along. For those of you following along in the peanut gallery, I finished applique sewing the pieces onto the background. I did have to take out and resew some of the sewing with the monofilament, which took some effort because sometimes when I went to resew it, the same thing happened again. My seam ripper got a workout. But the sewing is done and it looks great!

I found the fabrics for the borders (one 1” border closest to the image, plus a 4” border outside of that) and sewed those on. I was able to use some stuff I had in my stash for the 1” border, which was nice, but I did need to go find the correct navy blue to make the 4” border. (I also found the backing for this quilt in my stash!) I put it all together, and I’m really pleased with the result. 

Unfortunately, while I was working on the border for the Horseshoe Canyon quilt (yeah, I bet you forgot about that one), my sewing machine decided it was DONE with this nonsense, so it’s at the sewing center getting looked at (as of today). It’s still under warranty, and it seems like it’ll be a relatively simple fix, but it was just something I could not solve despite my best efforts. So…in the meantime, I have been finishing up the cutting for the abstract iceberg quilt, which will take me a while. The plan is to get all of that cut out, then to clip all of the pieces to their respective foundation papers, which will probably take me another couple of evenings to get done.

The Tracy Arm quilt got pinned with its backing and batting today, so that’s just waiting on the sewing machine, and I have a traditional quilt I was working on before this whole project that still needs the final hand sewing on the binding to be finished. At a trip to a different local quilt shop this past weekend, I found some fabrics for a different quilt I’d like to start, which will involve the layering applique pieces again (so, no sewing!). I’ll talk about that one in my next blog post. 

I will not be hurting for things to do while I’m machine-less!

When Bored…

Today, I took an unexpected sick day when I realized that I needed to deal with both a dentist appointment and what looks to be an infected tick bite (we don’t mess with Lyme disease up here in the northeast!). I feel fine, but I just needed to deal with these two appointments, and that was going to take a chunk out of my work day, so I just took it as a sick day. I was done dealing with both issues by about 2pm, so I decided to tackle the abstract iceberg foundation papers.

As a reminder, I planned this quilt out a couple of weeks ago. I have a foundation paper-pieced pattern that I’m going to use, and I copied all of the foundation papers for it and labeled them according to a diagram of the quilt back then, but stopped short of projecting the image onto the papers and deciding which piece would be what color. I tackled that part of the project today.

What I did:

I started by taking my felt design wall down and working with the bare wall. Fortunately, I have very light gray walls, so I didn’t have to cover them with white paper or anything like that to get true colors. I taped the foundation papers to the wall in the formation that they will be in once all of the fabric is sewn to them. So in the end, the papers covered the wall exactly the size of the final quilt. Then I turned on the projector and lined the image up with the papers on the wall. It didn’t have to be exact; this pattern’s pieces are pretty big, so a few millimeters here and there weren’t going to make a huge difference in the end.

Once the image and the papers lined up, I labeled each foundation paper with the colors that the four fabric pieces would be, based on the image that was projected onto it. This proved to be far more challenging than I thought it would be. The fabrics I have for this quilt fall into four main colors – light ice blue-green, light gray (with or without silver on it), dark gray, and white on white. I found that I need more than that. I’ll use everything I have, but I also need a medium gray, a silver on white, and several blues I did not expect to need – a slightly darker ice blue-green, plus a light and medium sky blue (I did find a good medium sky blue in my stash). I was actually a little surprised to find that there was as much variation in the colors in the image as there is.

About halfway through labeling the pieces, after adding yet another color, I started to wonder whether or not I should have done this part first, before I even tried to go out and get a bunch of fabrics. It probably would have been a good choice. I have a much better idea of what the fabric requirements are for the whole quilt (me =/= a good estimator of size), so I might not have gotten nearly as much fabric as I did without really knowing what kind of quilt I was going to make. But I’m also not sure I would have come this far in thinking about the design of the quilt without some fabrics in hand. So I think it could have gone either way. Could I have done this without having any of the fabrics? Sure. But I think I now have a different mind’s-eye image of this photograph, so if I had waited to get fabrics until I had finished what I did today, I think I would be making very different fabric choices.

I imagine that this will be a technique I use moving forward with other images and published patterns. It might be a little difficult with a pattern that isn’t foundation paper-pieced; I think I might have to take a look for some larger pieces of gridded white paper so that I can map out what a pattern might look like if the pattern doesn’t already come with a coloring page to experiment with different color combinations (both of the patterns I’ve used so far for the Horseshoe Canyon and abstract iceberg quilts have had coloring pages).

A couple of things I learned today:

  • I am out of Scotch tape. I’m not 100% sure when the last time was that I was out of Scotch tape, but it has to have been many, many years ago. I could have sworn I have more tape somewhere, but I couldn’t find it. I used the last piece on the last foundation paper.
  • Tape the pieces to the wall, but not to each other. All of the tape has to be peeled off afterward, and it’s easier to peel one piece of tape off of one piece of paper, not multiple pieces of tape off of each piece of paper.
  • Draw the contours of the image onto the foundation papers, even if you won’t use them in the final quilt. I drew the line between the bottom of the iceberg and the water onto the papers. I probably won’t use that info when piecing, but it will be helpful to have if I have questions or want to make a different choice if the water ends up looking weird.
  • Take pictures before you take everything down! The pictures should include closeups of every foundation paper with the image projected onto it, plus the whole image with the papers “behind” it. I didn’t want to tape all of those papers to the wall a second time, so I made sure to document it ALL.

All in all, I’m a big fan of this process. The jury is still out on whether the result will live up to my expectations.

Moving On…

So now that the Tracy Arm quilt top is (nearly) finished and all I need to do is sew on the borders, I need to come up with another project to do. Because, of course I do. My ADHD would ask nothing less of me!

Seriously, though. I am headed out to an area of my state I don’t normally visit this coming weekend, so I am planning to visit a quilt store or two while I’m out there. I’ll take the abstract iceberg quilt stuff with me so that I can round out my selection of fabrics for it, but I also want to bring another project or two that I’ll start sometime soon so I can begin sourcing fabrics for it. I don’t want to be limited to what I can find in my local shops, and sometimes the local shops don’t have enough variety in what I need, so grabbing even just a couple of fabrics for the next project or two will be useful.

One of the benefits of looking through the photographs I’ve taken over the years is that I’m finding lots of images that I had forgotten about but that are really nice! I am actively not limiting myself to the tried-and-true favorites I’ve leaned on over the years (we’ve already looked at why some of those won’t work for this particular project), so I’m digging into folders I haven’t looked at in a very long time. And I’m looking at all of the images in each folder.

When I look at a photograph, my mind immediately evaluates whether or not it’s a good image. Is it pleasing to the eye? Is there something in it that catches my attention? Would I put it up on the wall in my house? For the vast majority of the images I take, the answer is “no, there’s nothing interesting about this,” or more often “this didn’t come out the way I thought it would.” Sometimes it can be fixed through post-production work, but often it’s just “nope, this just didn’t work the way I imagined it would when I took it.” And that’s fine, honestly. I have come to understand over the years that I can take several hundred photographs over the course of a weekend and be able to count the ones I really, really like on one hand. (On a recent 12-day vacation, I took just over 3200 photographs and picked about 100 of them to share with family and friends. That’s about par for the course.) And I tend to take lots of different versions of the same image with the reasoning that when I get home, one of them will stick out to me. 

It’s fun to take a look back through images I literally haven’t looked at in years and look at them through the “would this make a good quilt?” lens. The one I think I’m going to work on next is one I’ve admired before – I have it printed out somewhere, and I had it on my wall at one point although it’s since been taken down in favor of other, newer images (I like to switch things up every once in a while). This image was taken in 2014 in Oregon, on scenic route 138 somewhere between Crater Lake and Roseburg. (I think. I didn’t take good notes.)

I’m interested in putting this one into the abstract bucket as well. Immediately, what came to my mind for this is a Lone Star in the middle, where the white waterfall is, with the greens and the browns surrounding it. I’m still sort of contemplating what this might look like, but I’ll probably begin working on sourcing fabrics for it soon. I have several Lone Star patterns, so I’ll also look through those soon to see if one jumps out at me as particularly conducive to mimicking this image. I’m also fascinated with the crossed fallen tree trunks at the bottom of the image, and that would be fun to recreate as well. So that’s the plan now that the Tracy Arm quilt is done (or nearly so).